Use SonarQube to debug PHP code
Installing and using SonarQube Community Edition to debug your PHP code its fairly easy. But in involves a number of steps, spread among few docs, so I decided to write myself this little memo to compile one single step-by-step flow for this.
I assume that I’ll be using SonarQube to check quality of my PHP project (though SonarQube supports dozens of languages). This project is stored locally and directly accessible (this article does not cover dealing with repositories or embedding SonarQube into your release pipelines).
I am using XAMPP to host my PHP projects locally, but that part doesn’t play any significant role here.
Perform installation
Steps:
- Install Java 17 JDK or JRE on your computer
- Download SonarQube Community Edition in newest available version
- Unzip this file to i.e.
C:\XAMPP\sonarqube
Now start your SonarQube server instance:
C:\XAMPP\sonarqube\bin\windows-x86-64\StartSonar.bat
Note that it will take some time (it took 10+ seconds and an intense fan work to get SonarCube up and running on i9 / 32 GB).
If your instance fails to start, check your logs to find the cause.
Start a project
- Log in to http://localhost:9000 using System Administrator credentials (
admin\admin) - Change password to something complex upon your first visit.
- Select Create new project → Manually
- Give your project a Project key and a Display name and select Set up
- Select Locally in the How do you want to analyze your repository? view
- Click Generate, write down your project’s key:
"test": sqp_75339ea7f6f7af449ff6c08c28703a6f08b5bffd
- Click Continue
- Click Other (for JS, TS, Go, Python, PHP, …)
- Click Windows
Details: https://docs.sonarqube.org/latest/try-out-sonarqube/
Install SonarScanner
Steps:
- Download SonarScanner in Windows 64-bit version
- Unzip downloaded files to a directory of your source, i.e.:
C:\XAMPP\sonarscanner - Double-click This PC on your desktop while holding Left Alt key pressed to go to Settings → System → About
- Click Advanced system settings and go to Advanced → Environment Variables…
- Double-click line with
Pathitem and click New - Copy-paste your SonarScanner’s path (i.e.:
C:\XAMPP\sonarscanner) and confirm with Enter - If you had any console window open, close it and re-open it, so it gets newest
Pathsettings - Edit the
C:\XAMPP\sonarscanner\conf\sonar-scanner.propertiesfile, to see ifsonar.host.urlpoints tohttp://localhost:9000 - Open command line and execute
sonar-scanner -hto see, if your SonarScanner instance is reachable
Configure your project
Steps:
- Go to your project’s root folder and create
sonar-project.propertiesfile there - Provide content similar to this:
sonar.projectKey=test
#sonar.projectName=Test
- If there’s any need, you may configure project’s version, source location and encoding as well:
#sonar.projectVersion=1.0
#sonar.sources=.
#sonar.sourceEncoding=UTF-8
Go to your project’s root directory (i.e. where sonar-project.properties file is stored) and execute scanner by providing your project’s token (which you generated previously):
sonar-scanner -Dsonar.login=sqp_75339ea7f6f7af449ff6c08c28703a6f08b5bffd
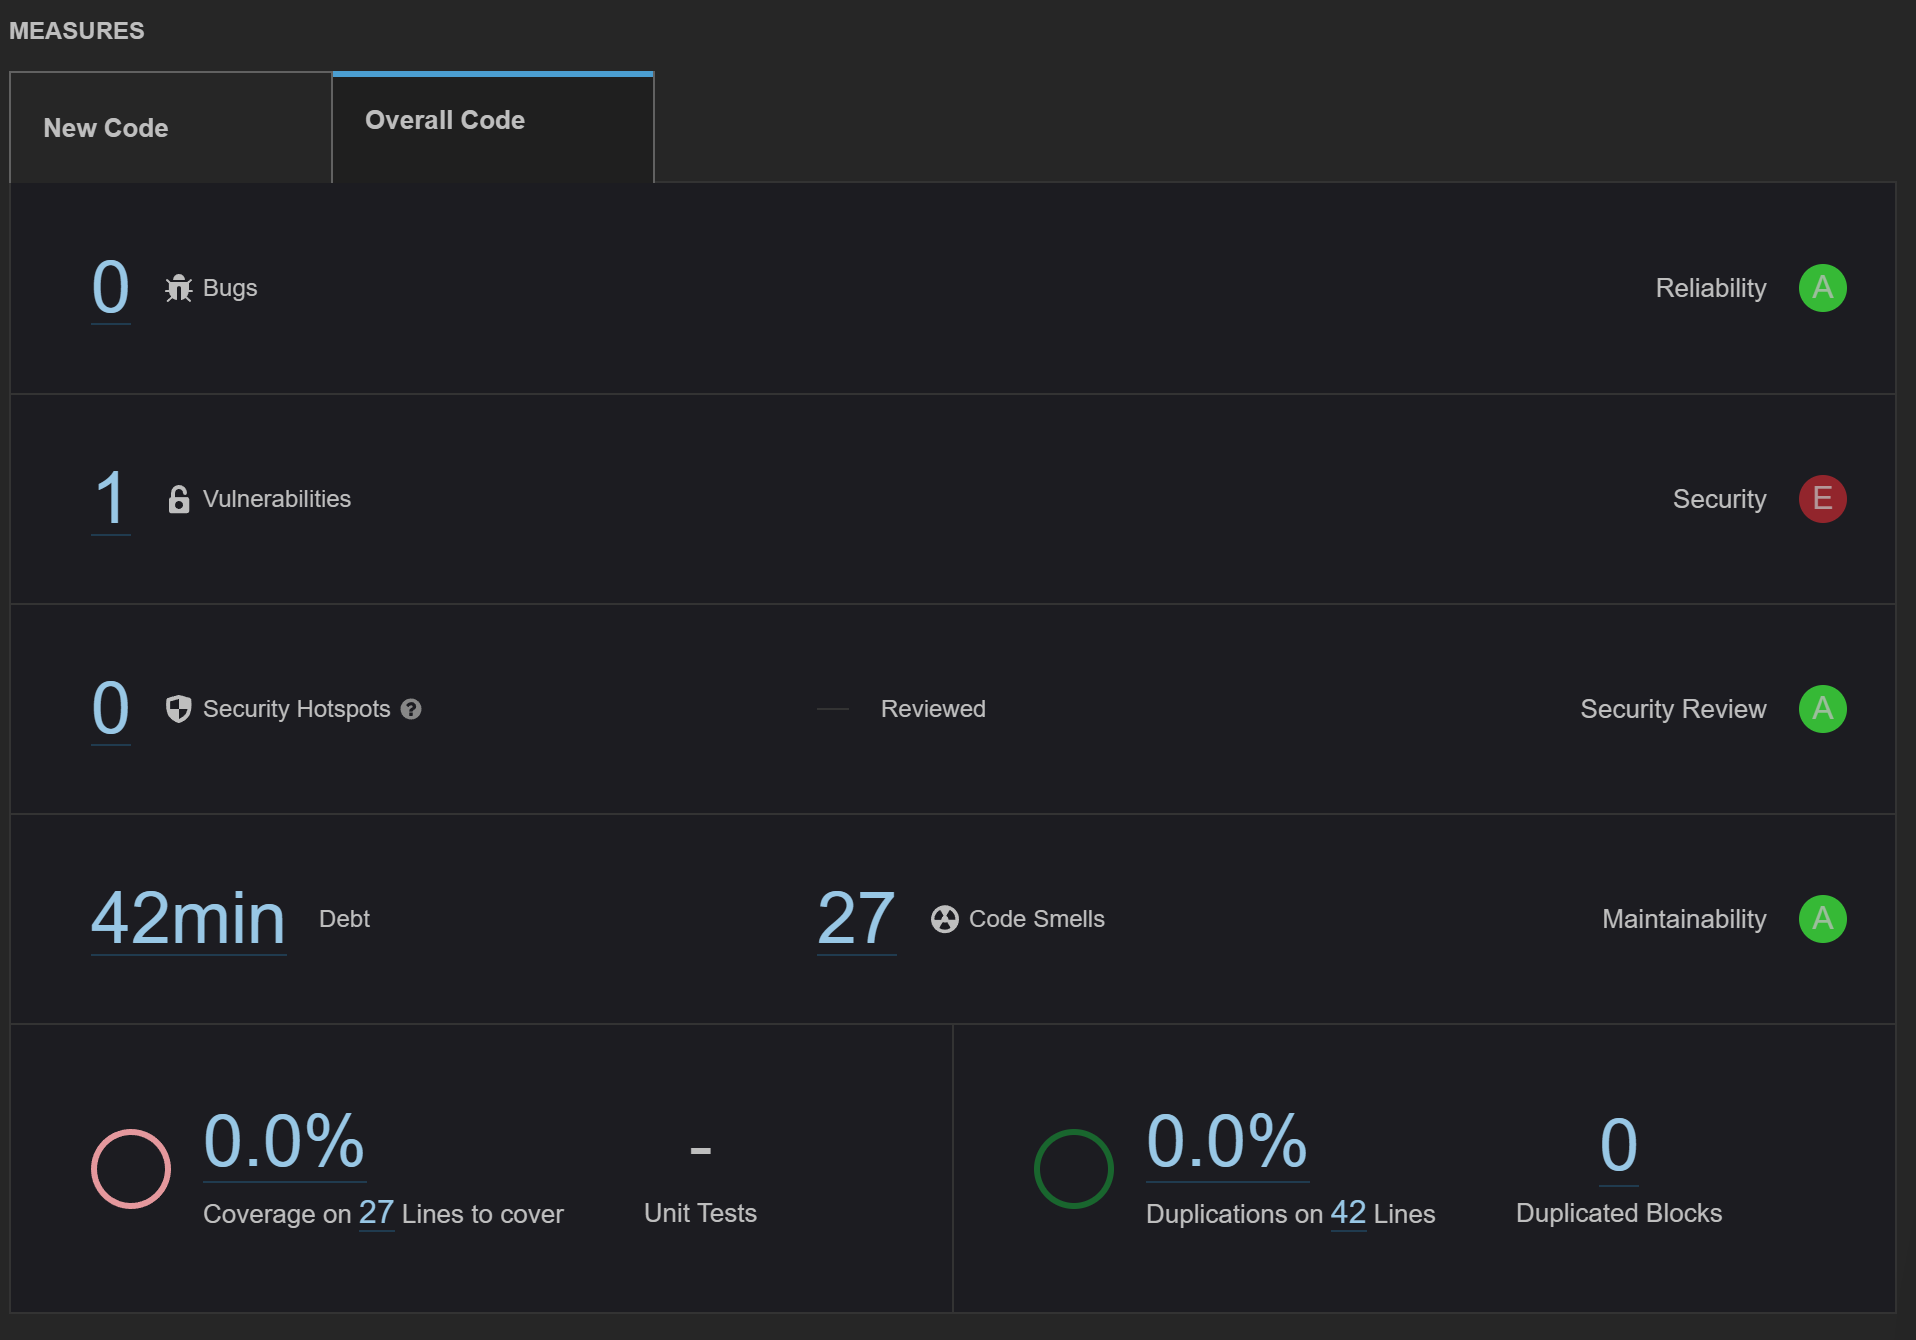
Go back to your SonarQube instance (in the browser), wait a couple of seconds and see the results of your project’s analysis:
Details: https://docs.sonarqube.org/latest/analyzing-source-code/scanners/sonarscanner/