Reducing PowerPoint presentation’s file size using brute-force method
Since Microsoft is Microsoft and the software produced by this company may surprise you in many ways, it may happen that the ideas given in the previous article turn out to be not enough. And file size of your PowerPoint presentation will still be too big.
In this case a more brutal method is needed.
Since every Microsoft Office document is in fact a .zip archive, we will try to reduce file size by direct modification or manipulation of the content of this file.
Prepare
You will need:
- Total Commander or any other software to manipulate on .zip archives
- Irfan View or any other image browser that has batch file processing functionalities
Depending on how quick you can execute each steps in this guide and what kind of presentation you’re dealing with, the entire process described here can take you between 30 seconds and 10 minutes.
Decompress
Uncompress contents of your presentation into a separate folder:
- Close all copies of PowerPoint
- Go to Total Commander and select presentation’s file
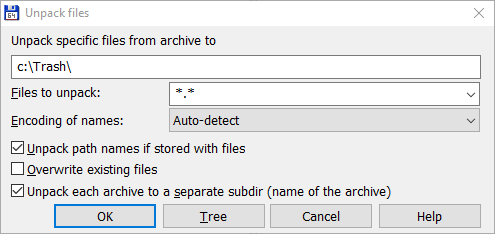
- Hit Alt+F9, select destination folder, check Unpack each archive to a separate subdir checkbox
- Hit OK or press Enter
Here we go:
Convert
Even if you strictly follow the idea given in this article in many situations Microsoft PowerPoint tries to be more clever than you and still saves some files as .png images. In many cases this is expected, but saving full page (entire slide’s background) photos as .png and thus producing 2-3 MB images per each slide isn’t too clever, don’t you think?
Let’s get rid of these manually, shall we:
- Go to folder where you unpacked your presentation
- Navigate to ppt\media subfolder and sort it by file extension
- Review all .png files and mark all that must be converted to .jpg
- Move all marked files into some separate folder.
Run IrfanView, display any image in it and then:
- Hit b to open Batch conversion window
- Make sure that Batch conversion is selected in Work as group
- Click Add all and Use current folder buttons
- Select JPG in Output format list
- Make sure that Use advanced options checkbox is checked below
- Click Advanced button to open Set for all images window
- Uncheck each and every checkbox except for:
- Overwrite existing files checkbox and
- Save files with the original date/time checkbox in the Miscellaneous group
- Click OK to close that window and then Start Batch to start the process
Go to Total Commander and navigate to that folder and then:
- Hit + button in the numeric keyboard block
- Put
*.pnginto Specify file type field and hit Enter to confirm - Hit Del and then Enter to confirm
- Press Ctrl+A followed by Ctrl+M to open Multi-Rename Tool window
- Replace
[E]with*.pngin Extension field - Hit Enter to start the process and Esc to close the window when you’re done
Make sure that you actually have all the images in JPEG format, but named as .png files. You can do this by simply opening any such file in IrfanView. If everything is as expected, it will warn you like that:
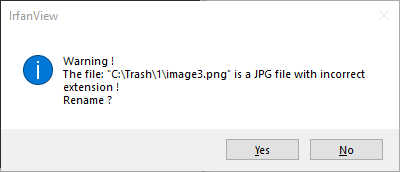
Of course do not continue (hit N).
Now, move converted image files from temporary folder back to ppt\media folder.
Compress
Go back to the root folder of the subfolder where you unpacked contents of your presentation (you should see: _rels, docProps and ppt folders and [Content_Types].xml files).
Then in Total Commader:
- Press Ctrl+A followed by Alt+F5
- Check the destination folder and confirm with Enter
- Change resulting file extension to .pptx (or .pptm if you have macros)
Open up produced file in PowerPoint and review the results.
Results
If everything is OK then you can save the presentation again in PowerPoint (even though you’ve changed nothing), because this in many situations can reduce file size even further.
This works (if it works for you) because PowerPoint’s image reader component ignores internal file extension. I.e. you can have file named with .png extension even though it fact it is in much less space occupying JPEG format. As long as the contents of such file are readable and contains actual image PowerPoint should be able to display it.
Is the whole idea worth following?
You must decide for yourself. Since I become a bit handy with the above method, it usually takes me less than 2-3 minutes to complete it. On the other hand, with these fairly easy steps I am able to reduce file size of a typical presentation sometimes even by 75% or more:

So, I believe that it certainly is worth following.