My private Windows 10 check-list [updated]
Let’s say that I don’t like Windows 10. Mostly for the fact that a lot of things there are simply unusable or hard-to-use in the default configuration. And need to be changed in order to make them more usable. Since I have quite a few PCs to manage and have to go through this procedure on regular basis, I made my personal list of things you have to disable, uninstall, tweak up or change in Windows 10.
Look for the information in the corner — half an hour of a quick reading! This is really long and detailed article!
Update! Note that this article, written in April 2018 and targeting Windows 10 1511, is year later little bit outdated. If you’re using Windows 10 1903 then you may find certain things on these lists OK or otherwise not needing any change or tweak up.
Contents
Encrypt all disks
If you’re using a notebook (or any other computer storing any private or otherwise sensitive data) then you are strongly advised to encrypt all disks, including system one and all removable disks that may be stolen or lost.
Previously this chapter was was the last one. But then, after some thinking, I decided that encrypting disks should be the first operation that I do, right after installing pure Windows 10. This is because — in case of any fuckup — I won’t loose all the long time needed to perform the following, very long list, and all I will be forced to do, will be to reinstall Windows again.
Here are some tips and info about disk encryption in Windows 10.
- what to choose:
- information, advantages and disadvantages of BitLocker:
- is expensive — requires Windows 10 Pro or Windows 10 Enterprise, not supported in Home version,
- requires proper hardware support and some changes in your BIOS (see below),
- is built-into system; you don’t need any additional software to use it,
- allows you to encrypt only data that is already present on disk, instead of whole disk, which is 10-20 times faster,
- does not support PIN, key or password during boot by default and you must enable it manually (see below),
- you may configure BitLocker to run computer without pre-boot PIN; it is much less safe, but possible.
- information, advantages and disadvantages of TrueCrypt / VeraCrypt:
- using TrueCrypt is still safe (or at least was, back in 2014), but due to stop of development any new vulnerabilities and bugs won’t be fixed. Thus, using any fork or any other way of encrypting your hard disks is a more reasonable decision as of now,
- does not support partial disk encryption (i.e. encrypting only data that is already there), must encrypt entire disk,
- encryption of 512 GB disk (full) can take 24-48 hours, but you can use your computer normally during this process,
- you must provide a key during each boot and there is no way to disable this.
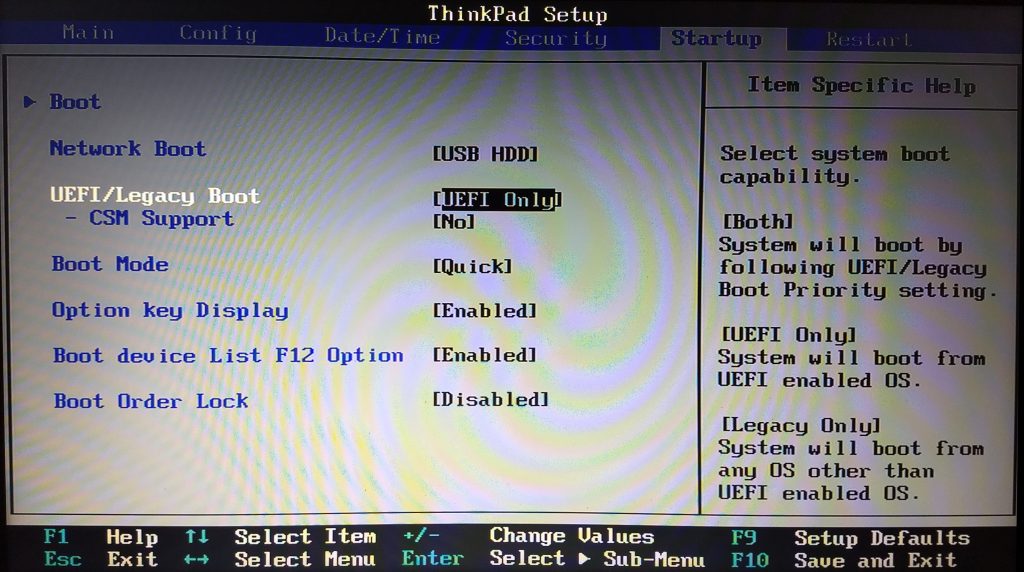
- requirements for BitLocker:
- your need to have correct hardware support:
- TPM 2.0:
- your motherboard, BIOS and hard disk must support UEFI,
- legacy and CSM modes of the BIOS are not supported and must be disabled,
- if you have installed Windows in CSM or legacy mode, it will not boot after disabling these modes (i.e. after enabling UEFI only support) and you must convert your disk to UEFI using MBR2GPT tool (your data won’t be lost or modified) prior to enabling UEFI support.
- TPM 1.2:
- no special prerequities, but it is considered less safe and does not offer special functionality,
- still is far enough for most home usages,
- if you’re BIOS supports both TPM 1.2 and 2.0 and TPM 2.0 is enabled by default then enabling TPM 1.2 will most likely invalidate your PIN-based login (Windows Hello) and you will be forced to create new PIN during next Windows login.
- TPM older than 1.2 or no TPM: BitLocker can be enabled, if you meet special requirements (pre-boot password, USB key etc.).
- TPM 2.0:
- in many cases you must alter boot sequence in BIOS to enable BitLocker:
- hard disk must be first in boot order, before any USB or CD-based boot devices,
- even if you always boot from hard disk, it may not be first in boot sequence (it can have lower priority, but devices with higher won’t boot due to i.e. lack of media etc.), so double check that in your BIOS,
- changing boot sequence after BitLocker has been enabled will require you to use recovery key.
- your need to have correct hardware support:
- if using BitLocker, remember to enable pre-boot PIN to increase security (details are here or here):
- press
Windows+R, typegpedit.mscinto the Run dialog and pressEnterto confirm, - open Computer Configuration > Administrative Templates > Windows Components > BitLocker Drive Encryption > Operating System Drives in the Group Policy window,
- double-click the Require Additional Authentication at Startup option in the right pane,
- select Enabled,
- change value of Configure TPM Startup PIN to Require Startup PIN With TPM,
- click OK to confirm and save your changes,
- right-click the Start button and click Command Prompt (Admin),
- type and execute the
manage-bde -protectors -add c: -TPMAndPINcommand, - validate this by executing
manage-bde -statusand checking whether Key Protectors shows TPM and PIN, - read the source article for this part to see how to change or pre-boot PIN or disable it completely (not advisable!).
- press
- don’t forget your password (!):
- if you do (and loose your rescue disk in the same time) then you’re really totally screwed!
- there is absolutely no way to recover your data, no, nein, ne pas,
- it is scrambled with your hash (your password) and only this password (or rescue disk) can unscramble it,
- don’t even bother searching the Internet or asking stupid questions on forums or Q&A sites; no password + no rescue disk = no data!
- encrypt system disk and all external disks or pendrives that holds sensitive data!
Just a reminder photo that using BitLocker with TPM 2.0 chip supports UEFI only devices and does not support CSM.
Uninstall garbage
- Remove all programs that you don’t need and that offers “Uninstall” option:
- in Apps & features tab of Apps module in Settings,
- by browsing Start Menu, right-clicking any unnecessary item and picking
Uninstallmenu item, - things that you cannot remove these ways, can be uninstalled using CCleaner (see end of this article).
- Uninstall unnecessary features using “Turn Windows Features on or off” applet in Control Panel:
- yes, you can finally get rid of Internet Explorer 11, XPS Document writer and Windows Media Player!
- consider installing Direct Play in Legacy Components, if you play a lot,
- If you’re using a common account:
- where:
- in Windows — Microsoft account,
- in Chrome — Google account,
- in other browser — ???
- you may need to remove some automatically installed apps:
- from Windows — go to Settings > Applications > Apps and features,
- from Google — remove corresponding extension.
- to stop this from happening:
- in Windows — go to Settings > Accounts > Sync your settings,
- in Chrome — go to Settings > Sync > Manage sync.
- where:
- Uninstall built-in apps — there’s a separate article for this.
Install missing software
Look above (into previous section) — if you have logged in with your Microsoft account and have settings sync enabled then some of your apps may already be installed.
- Total Commander:
- English only,
- INI files in user folder (or else TC won’t be able to save configuration, tabs etc.),
- add private license key,
- add private configuration files (main + FTP).
- Notepad++:
- add private settings, themes and plugins, restart program,
- if Plugin Manager is not available, install it manually,
- if it is available, use it to update existing and add missing plugins,
- verify, if Total Commander has correct path to Notepad++ and you can edit files within it.
- Chrome:
- login, enable synchronization, set sync settings verify that all bookmarks, passwords etc. are there,
- login with current computer / browser to https://messages.google.com/,
- check, if you have all languages installed, correctly configured (UI, spell check) and if pages are displayed in the language of your choice by default.
- Microsoft Office:
- remove unwanted components, if necessary (for certain Office versions on Windows 10 this can be a bit tricky),
- install language packs for your country, if any are missing (see below),
- copy some private Office templates and check, if everything is OK,
- customize Office settings,
- if you can’t or don’t want to use Microsoft Office:
- Office viewers are now decommissioned, but you can install Word Mobile, Excel Mobile and PowerPoint Mobile instead,
- these programs are free to use, but you have to install them through Microsoft Store application,
- OpenOffice is an alternative, if you need full editing functionalities (i.e. full office suite) free of charge.
- get rid of “SkyDrive Pro” item from context menu:
- launch Registry Editor,
- paste
HKEY_CLASSES_ROOT\AllFilesystemObjects\shellinto address bar and hitEnterto navigate. - right click on SPFS.ContextMenu and select
Deleteto delete the key.
- Other software to consider:
- browsers: Chrome, Microsoft Edge, Firefox, Opera,
- communicators: Skype, Rocket.Chat+ and Slack, if needed,
- basic multimedia support: IrfanView and VideoLAN VLC plus optionally some format conversion tool,
- PDF reader: Microsoft Edge, Acrobat Reader DC (huge!), Foxit Reader or SmallPDF’s PDF reader.
- update Microsoft Edge to the newest edition, if you use it and still have the old version.
- Drivers:
- update all hardware drivers, if needed,
- remember that Windows 10’s drivers have often weird problems, so always pick device manufacturer’s one:
- printing or scanning is much slower on Windows driver than on native one,
- some modes are not supported — i.e. errors when trying to scan using hardware duplex etc.
- for all printers and scanners that you often use; remove those unused (i.e. Send to OneNote, XPS Writer etc.),
- check, if default printer is selected correctly and check its default settings (paper type, duplex usage etc.),
- it is always a good idea to fully restart (shut down + start up) both computer and printer after installing drivers (!),
- install NAPS2 (add templates) or IrfanView or configure Windows default app or whatever you use for scanning,
- if you have Synaptics touchpad and see some stupid messages, when using Ctrl+Alt+l, here is the fix.
- OneDrive:
- general:
- make sure, it is working, login and verify synchronization,
- change location of the folder to C:/OneDrive (unless you have more users in your Windows!).
- Settings tab:
- decide if synchronization should be stopped in certain scenarios,
- consider removing some notifications, if they bothers you,
- disable Files On-Demand option:
- all files will be stored on your disk and available irrespective of the Internet connection,
- this will remove sync status column which presence may be irritating to some,
- this will also fix the icons overlays problem and OneDrrive folders will again have correct overlays.
- Backup tab: disable automatic upload of special folders, images from connected camera and screenshots taken.
- Office tab: disable connection between OneDrive and Microsoft Office in settings, if that pisses you off.
- general:
- TeamViewer or other remote access solution (if you need it):
- TeamViewer:
- allows controlling current account; you can do something on someone else’s account,
- works out-of-the box; no additional configuration needed, even for external connections,
- paid and awfully expensive for commercial use; free for private usage,
- often incorrectly detects private usage as commercial and blocks you from access,
- things to consider after installation:
- change options:
- General tab:
- disable starting TeamViewer with Windows,
- change theme to dark.
- Remote control tab: uncheck removal of partner’s wallpaper.
- Advanced tab:
- uncheck closing to tray menu,
- uncheck / disable integrated system health checks,
- enable automatic minimize of local TeamViewer panel.
- General tab:
- use Computers & Contacts in main window to login to your account, if you have one.
- change options:
- Remote Desktop:
- always uses your account; you cannot change or do anything for other user,
- you must forward port 3389 on your router for connections out of home network (external),
- free of charge for any kind of connections, but requires Windows 10 Pro license.
- TeamViewer:
- Microsoft Edge: If you’re using it, turn off all the news-like garbage, it displays by default when opening it.
When it comes to Microsoft Office and installing language packs (point 4. above) this can be a little bit tricky or even weird. Unfortunately, some moron at Microsoft packed some 32-bit component into 64-bit edition of Office. This prevents installation of 64-bit language packs, even if you have 64-bit edition of Office. You’re forced to use 32-bit language packs only.
Fortunately, this problem touches only a small group of people, who are using Office in i.e. English and need some non-English language packs.
Customize Windows
- Change main color theme to something around green, check resolution and other screen / view settings,
- Change power settings:
- change the time when your screen is turned off:
- regular screen timeout — by regular means (settings in Control Panel),
- lock screen timeout — by messing up in Windows Registry,
- enable hibernation in Windows 10:
- hit
windowsbutton, typePower Optionand hitEnter, - click Additional power settings,
- click Choose what the power buttons do,
- click Change Settings that are currently unavailable link,
- check Hibernate,
- click on
Save changes.
- hit
- change when you close the lid or press the Power button:
- closing the lid — sleep,
- pressing the Sleep button — nothing,
- pressing the Power button — nothing.
- change the time when your screen is turned off:
- Set default apps by: type (i.e. browser, video player), opened file type and optionally by protocol.
- Customize your screen and display settings:
- get rid of tips and nags on your lock-screen:
- you can get rid of it, if you disable Windows Spotlight and change background to picture or slideshow,
- an alternative solution of turning nags off in Group Policy Editor is not working (at least for me),
- the method with messing up in Registry Editor works on some PC and fails on another.
- configure night light settings.
- get rid of tips and nags on your lock-screen:
- Customize Advanced system settings:
- get there:
- hold Left Alt on your keyboard and double click This PC icon on desktop,
- click Advanced system settings in the left pane.
- Computer Name tab:
- change device network name and optionally workgroup, if needed,
- change network ID to home network, if that is required.
- System Protection tab — consider enabling Restore Points functionality:
- select system disk (c:/) and click Configure,
- select Turn on system protection and set Max Usage to approx. 10%,
- create restore point now and remember to create it on regular basis when performing extensive changes to the system.
- Remote tab: enable Remote Desktop connections, if you need it and if your Windows version allows this (Pro required):
- change Remote Desktop to Allow remote connections to this computer,
- uncheck the checkbox below, if needed — i.e. if you have any troubles connecting to this PC.
- get there:
- If you’re using Maps, consider downloading off-line versions of maps for regions of your interest.
- Right-click Trash, select Properties and check Display delete confirmation dialog.
I still can’t stop wondering, who was dumb enough to make delete confirmations turned off by default?
Customize File Explorer
- Pin most popular folders to File Explorer’s context menu:
- drag and drop each folder to taskbar, remember about correct order,
- no more items corrections in Windows 10 in menu, but you can change order in File Explorer > Quick Access.
- Change File Explorer’s column settings:
- display type: Details (Ctrl + Shift + 6),
- order: Name, Size, Type, Date,
- sizes: 300, 100, 120, 120,
- order by: Type,
- go to: File > Options > View and hit Apply to Folders > Yes,
- repeat above steps for all folder types (right-click > Customize this folder),
- set all folders to General items:
- go to c:/, select all folders,
- right-click + Properties,
- go to Customize,
- select General items and check the checkbox below,
- click OK to confirm.
- you may need to repeat above steps few times / after few system restarts until Windows finally “gets this”.
- Change File Explorer’s general settings:
- General tab:
- purge Quick Access (and File Explorer’s context menu):
- uncheck Show recently used files in Quick Access,
- uncheck Show frequently used folders in Quick Access,
- click Clear next to Clear File Explorer history.
- change Open File Explorer to: to This PC.
- purge Quick Access (and File Explorer’s context menu):
- View tab (Advanced settings list):
- Files and Folders group:
- check Always show folders, never thumbnails,
- uncheck Display file icon on thumbnails,
- check Display file size information in folder tips,
- check Display the full path in the title bar,
- uncheck Hide extension for known file types,
- check Launch folder windows in separate process,
- uncheck Use Sharing Wizzard (Recommended).
- Navigation pane group:
- uncheck Always show availability status,
- check Expand to open folder,
- check Show all folders,
- uncheck Show libraries.
- Files and Folders group:
- General tab:
Ultimate Windows Tweaker
My “garbage removal” list would never be complete without the Ultimate Windows Tweaker.
This program allows you to remove a really wide area of garbage out of your system (in many cases you will be even surprised what can you tweak with it!). You can also use this program to set some Windows’ configuration options that are suppose to be not “changeable”.
For example, I use this program to (among many other things) to remove garbage in the left side panel of Windows Explorer (see end of above linked article for details).
- Clean up (remove, add, reorder, move between folders) everything in Start Menu if you’re still using it:
- all user items:
C:\ProgramData\Microsoft\Windows\Start Menu\Programs, - your items:
%appdata%\Microsoft\Windows\Start Menu\Programs, - some apps does not appear in any of these folders (see below),
- you don’t have to do this, if you’re not using classic section of Start Menu (and you only use pinned tiles section).
- all user items:
- Customize contents of Send to… menu:
- open / execute
shell:sendto, - remove unnecessary things (i.e. Bluetooth),
- add missing elements (i.e. Notepad++),
- for items in Menu Start you must right-click and select Open file location first.
- open / execute
- Pin most often used programs to:
- Start Menu:
- Tools: IrfanView, Paint, VLC, File Explorer, Total Commander, Calculator, Notepad++ and Notepad,
- Office: Word, Excel and Power Point,
- Internet: Chrome, Edge and Skype / Slack.
- desktop:
- network: PuTTY,
- hardware: Naps+,
- tools: Total Commander and Chrome,
- Office: Word, Excel, and Power Point (consider Sway).
- taskbar: File Explorer, Total Commander, Chrome, Edge, Notepad++, Notepad, Word, Excel and Power Point.
- Start Menu:
- Customize taskbar and notification area using Settings — see below, 5th point.
Some items (point 1 above) are “special” and you can’t move them anywhere. There’s no way to do this — they does not appear in above folders and drag-and-drop does not work in Start Menu i Windows 10. Thus, consider pinning all of them to Start Menu (point 4), organising into groups and hiding “real” Start Menu at all (there’s an option for that — see below).
Note that there’s a new Start Menu in Windows 10 and you no longer can create desktop shortcuts, by just dragging items from Start Menu to desktop. Instead you have to open corresponding folder — all user items (C:\ProgramData\Microsoft\Windows\Start Menu\Programs) or your items (%appdata%\Microsoft\Windows\Start Menu\Programs) and you have to copy shortcuts from there to your desktop. If required shortcut is not there then you have to manually creating it, by locating corresponding executable file and dragging it into desktop.
Customize basic things with Settings
Certain things that are customizable through Control Panel and Settings have already been mentioned. Here are the remaining ones and only the most important ones (for me — of course! :>):
- System module:
- Notifications & actions tab:
- adjust quick actions to your needs (click Edit your quick actions):
- organize items:
- on all computers: Night light, Project, All settings and Screen snip,
- in addition, on laptops: Battery saver, Airplane mode and Brightness.
- remember that:
- you can always quickly bring Action Center in with
Win+A, - Battery saver is disabled when your laptop is plugged-in,
- Brightness does not work correctly, if your laptop is connected to an external screen.
- you can always quickly bring Action Center in with
- organize items:
- change notifications settings, if default ones doesn’t suit you.
- adjust quick actions to your needs (click Edit your quick actions):
- Focus assist tab: disable functionality for Screen Duplication and Full Screen.
- Tablet mode tab: disable completely on non-touch devices:
- change When I sign in to Use desktop mode,
- change When this device automatically switches tabled mode on or off to Don’t ask me and don’t switch,
- Clipboard tab:
- enable Clipboard history,
- use this functionality by pressing
Windows+V.
- Remote Desktop tab: enable and configure, if you have Windows 10 Pro and wish to use this functionality:
- if you want to allow external connections, you must enable 3389 port forwarding on your router (details),
- click Show settings next to second checkbox and enable files and printers sharing in private networks,
- some checkboxes may be disabled due to i.e. battery and power profile settings,
- get Remote Desktop client for your system, if you need one.
- Notifications & actions tab:
- Devices module > Autoplay tab: configure to suit your needs.
- Phone module: add and configure your phone (if you really think, it is worth doing so, because it isn’t).
- Network & Internet module:
- Wi-Fi tab: remove garbage from known networks and add networks that does not broadcast SSID.
- Ethernet tab: assign static IP address to your device, if this is required.
- Personalization module:
- Background tab:
- change single image into slideshow:
- copy wallpapers from some source to local disk, get a path to destination folder,
- change background mode to Pokaz slajdów,
- hit Przeglądaj and locate folder with your images,
- enable Pomieszaj and Uruchom pokaz slajdów nawet podczas zasilania z baterii.
- or leave it on single image and optionally change it.
- change single image into slideshow:
- Lock screen tab: change image and configure notifications, if default settings doesn’t suit you.
- Start Menu tab:
- disable showing of more tiles,
- hide applications list (cluttered and useless — use
Windowskey on keyboard + start typing), - disable suggestions, full screen and last items,
- click Choose which folders appear on Start and configure this section to match your needs.
- Task bar tab:
- enable desktop peek,
- set buttons combining to Never,
- disable People,
- disable replacement of Command Line with Windows PowerShell,
- clean-up icons that appear on the taskbar: power, network, volume, some communicators, etc.,
- clean-up system icons that appear on the taskbar: clock, volume, network, power; optionally disable Action Center.
- Background tab:
- Accounts module:
- Sign-in options tab:
- replace password-based login with PIN-based login, if this wasn’t changed before,
- enable face recognition or fingerprint-based login, if you want it and if your hardware support this,
- Family & other users tab: add as needed.
- Sync your settings tab:
- disable, if you’re using only one computer ever or
- verify your personality and enable passwords synchronization,
- modify other settings in this section as needed.
- Sign-in options tab:
- Time and language module:
- Date and time tab: enable automatic timezone, if you travel a lot.
- Region tab: change regional settings, if default doesn’t suit you (see below).
- Ease of Access module > Keyboard tab in Interaction group:
- turn off shortcut keys for Sticky Keys, Toggle Keys and Filter Keys functionalities,
- enable using Print Screen key to start Screen Snip tool, if you’re using it,
- Privacy module: Well… I disable everything that I can and lower everything to Minimum or Never.
- Update & Security module:
- Windows Update tab: verify and change Active hours, if any changes are needed.
- Delivery optimization tab: Enable local network sharing.
- Find my device tab: Enable on laptop or any mobile device.
For the Time and language module and Language tab here is an example configuration:
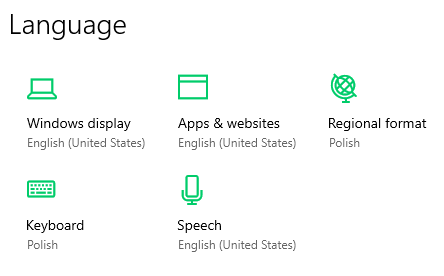
It is useful, if you have English Windows, but wish to use non-English keyboard or regional settings.
Customize advanced things with UWT4
Use Ultimate Windows Tweaker (download here and maybe read extra info here) to fix and tweak anything that you want change, but you are not allowed to.
Keep in mind that you have to click Apply Tweaks for every group and tab that you see. There is no “global apply all my changes” option in UWT anymore. Also note, that each click to Apply Tweaks will make your wallpaper and taskbar gone for a 1-2 seconds. This is due to File Explorer being restarted. This is a bit annoying, but in the same time — a perfectly normal situation.
List of suggested changes:
- Customization group:
- Windows 10 tab:
- Customize Power Menu: enable hibernation, if you haven’t done this so far,
- Quick Access: disable frequent folders and recent files,
- Microsoft Edge:
- change or set default download location,
- disable tab preview and “Close all Tabs” confirmation.
- File Explorer tab:
- check Check by Default “Do this for all current items”,
- uncheck Show OneDrive in Navigation pane (this option may not be visible in certain scenarios).
- Universal UI tab — Miscellaneous frame:
- consider checking Disable “Look for an app in the Store”, if that popup notification you,
- consider checking Disable “You have new apps that can open this type of file”, if that notification annoys you,
- check Disable All Live Tiles, if such kind of content in Menu Start annoys you.
- This PC tab: disable (uncheck) everything in Customize Inbuilt Folders frame.
- Windows 10 tab:
- Performance group: visit it, if you need to speed up a slow PC; check and uncheck on your own favour.
- Security & Privacy group:
- Security Settings tab:
- check and uncheck on your own favour, if you are a security and privacy maniac,
- keep in mind that you’re disabling a core processes, which may kill your Windows,
- in general I am leaving most of this items enabled to not kill my system,
- checking Disable OneDrive in Windows frame may be useful on office/shared PC or if you don’t use this service at all and its presence in different aspects of the systems or applications annoys you.
- Privacy tab:
- check and uncheck on your own favour, if you are a privacy maniac,
- things to consider — you are disabling given thing to all applications (!):
- revoking access to camera or microphone can kill your messaging app (Skype etc.),
- allowing access to location may be handy or useful for you in certain scenarios (web browser),
- Windows Update data sharing can speed up your updates download — think twice, if you want to disable this,
- for users of Microsoft account:
- enabling settings sync is useful, if you’re using the same account on many devices,
- disabling access to user account may ruin things in your account that you control via browser.
- in general I am checking most of these items (but not all!) to prevent Windows 10 spying on me.
- Security Settings tab:
- Internet Explorer group:
- Windows 10 1903 finally allows you to uninstall IE completely (in Turn Windows Features on and off) so you can safely ignore this tab.
- Context Menu group:
- Universal Apps tab: enable, what you may need (most / all things are disabled by default here).
- Desktop Context Menu tab: as above, disable not needed or enable, if you need quick access to something.
- Desktop Context Menu 2 tab:
- Context Menu Tweaks frame:
- check Add “Take Ownership” option to files and folders (useful for deletions!),
- uncheck Add “Open Command Window Here” option (useless and irritating).
- Drives frame: add any drive, if you wish to have a quick access to it via context menu.
- Settings frame: as above — add any setting, you wish to have a quick access to.
- Context Menu Tweaks frame:
- Other Context Menus tab: remove garbage; add what you may really need.
- Additional group:
- Additional tab:
- Network Tweaks frame:
- check Restrict Access Over Anonymous Connections,
- check Disable Recent Shares in Network Places,
- check Disable Default Admin and Disk Drive Share Server,
- check Prevent Network Auto-Discovery,
- check Hide Computer From The Browser List,
- check Enable NTLM 2 Support.
- Ultimate Windows Tweaker Options frame: export settings, if you wish to re-use them in future.
- Edit OEM & Registered Information button:
- use, if you wish to change logo and information that appears when double clicking This PC when holding
Left Altbutton pressed or when selecting Properties item from This PC‘s context menu, - remember that logo must be 120×120 pixels bitmap stored somewhere on your disk,
- some text information that you enter here may not be visible in certain editions of Windows 10.
- use, if you wish to change logo and information that appears when double clicking This PC when holding
- Network Tweaks frame:
- Troubleshooting UWT tab: use in case of any problems.
- Additional tab:
Depending on each tweak that you made, it is applied:
- immediately (after clicking Apply Tweaks in each view / screen),
- after File Explorer process is restarted (UWT handles this internally for you),
- after logging-off and logging-in current user,
- after full system restart.
You don’t have to restart computer after each most critical (thus requiring system restart) tweaks are applied, but a one-time full system restart after all tweaks are applied is generally considered a good idea.
If you’re messing up with some core processes (i.e. Security Settings tab in Security & Privacy group) then creating a restore point might be a good idea.
Final tweaks
Some things to consider as the last steps:
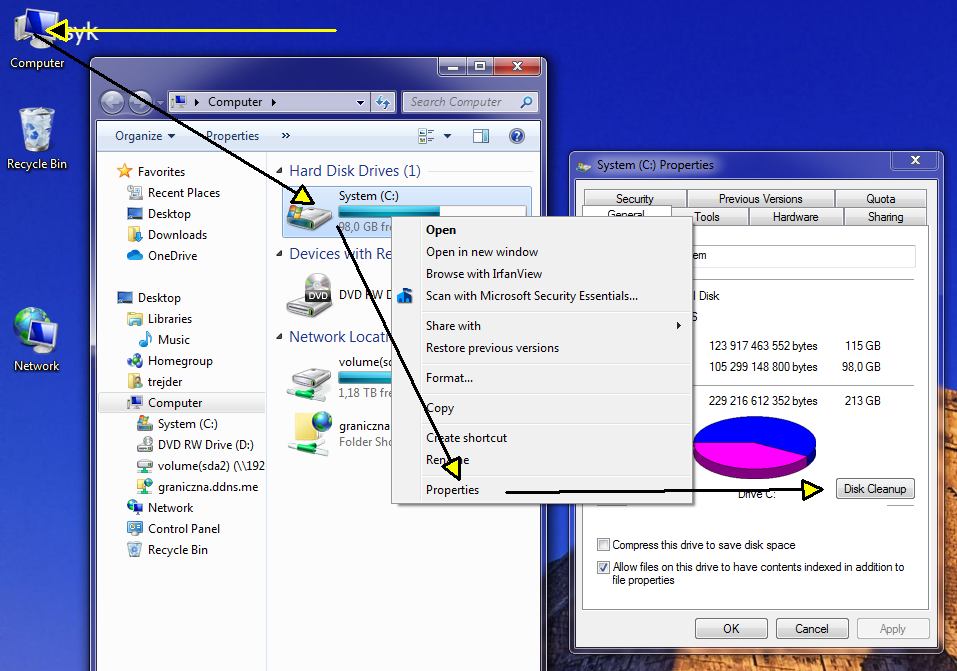
- Purge your system out of unwanted or not needed files.
- you may use Disk Cleanup tool that is present in Windows 10:
- you will find it in General tab of each disk properties,
- thus, the better (more flexible and working) option is to use CCleaner or a similar tool:
- perform general system cleanup, using either Easy Clean or Custom Clean methods,
- cleaning Registry is risky in my opinion; won’t save you much, but can cause a lot of troubles,
- uninstall things that cannot be uninstalled the regular way (Tools > Uninstall),
- review and optionally clean system startup queue (Tools > Startup),
- same as for Browser Plugins, but most of the things can’t be removed using CCleaner,
- other stuff like Duplicate Finder and Disk Analyser are for your consideration.
- check files in c:Windows.old folder and then remove it (manually, using Disk Cleanup tool or using CCleaner).
- you may use Disk Cleanup tool that is present in Windows 10:
- Use NirSoft’s tools to clean-up your system even more:
- ShellMenuView or ShellExView to purge unwanted items from context menu,
- UninstallView to try to remove even more unwanted applications,
- WhatInStartup to purge startup sequence and speed up your computer,
- review other system tools or all tools in general, as there is an impressive number of them made available and all of them are for free,
- it is a good idea to keep then and use them from time to time.
- If you haven’t used WhatInStartup (above), review all the stuff that is auto-run at startup:
- there are many ways of doing this, I personally love 6+ years old solution from Mike Lin,
- unfortunately, his website (in version with freeware software) is now available only as an archive,
- you can try to download Startup Control Panel 2.8 from there (a direct link) or search the Internet for it,
- as an alternative, you can use CCleaner (Tools menu in left sidebar).
- Add additional users, if needed:
- there is no guest-like account in Windows 10 1903, you just add another, regular user account,
- even though there is no guest-like account, Guest name is reserved and you must pick i.e. Visitor etc.,
- the official way is irritating, because you must provide three security questions for each added account,
- the unofficial way, with using command line, is faster and easier and don’t force you to provide these,
- there is no direct way to create another admin account, you just add another user and then change account type.
- Verify whether Remote Desktop is working for you, if have more computers and you’re going to use it.
At the very, very end…
Keep in mind that it is strongly suggested — when all tweaking and configuration to Windows is done — to create a separate admin account with password and to convert your day-to-day account into regular one.
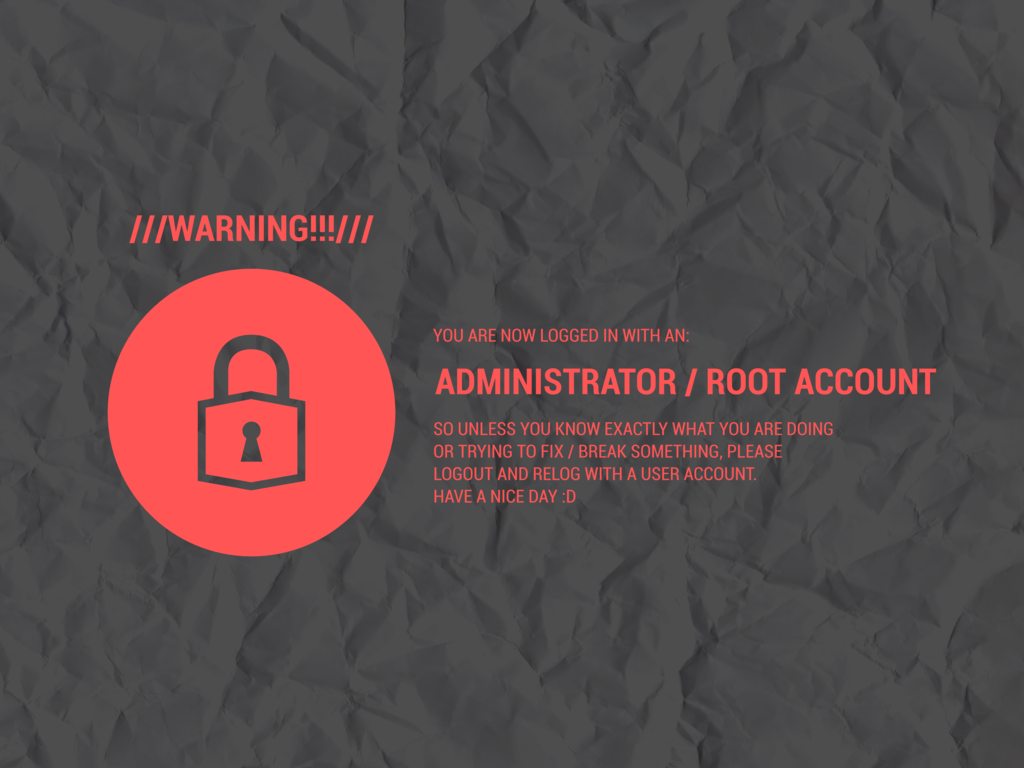
For security reasons you shouldn’t use administrator account on daily basis.