Get started with Raspberry Pi
In this quite old article I have provided just a typical non-sense introductory blah, blah about playing with Raspberry Pi. People who hasn’t done anything yet to their RPi box where sent there to the original “Get started with Raspberry Pi” article at the RPi’s homepage.
Now, it is time to write my very own “getting started” article. A short list-command memo of what should be considered after you unpack, power up and access via SSH your next RPi box.
A lot of things discussed in this article can be configured using great Raspberry Pi’s configuration tool. You can get access to it by executing:
sudo raspi-config
For my twisted pleasure and to learn new things, most operations in this article are made by executing various commands from RPi console. Your are not required, expected or even obligated to do the same.
Update
Skip this point, if feeding data to Flightradar24 (i.e. using Pi24 image)!
Before you do anything to your Raspberry Pi, a quick call to
sudo apt update
sudo apt upgrade
sudo apt autoremove
or all three in one (sudo apt full-upgrade) seems to be an absolute must. Make sure that everything you already have is up to date.
Users
Change default user’s password
Login as a pi user (with default raspberry password) and then:
sudo passwd pi
exit
Verify after that, if you can login as pi with your newly set password.
The pi user is not a super-user and you have to type sudo before each command. You can also use sudo su once to elevate pi user just for current SSH session.
Read more on Linux users at Raspberry Pi homepage.
Change default user’s name
Giving both pi and root users a strong unique password should be enough in terms of security (as long as your RPi does not control Mars rocket launch). But you may still consider changing default username from pi to something else (fr24 in my case, since I am using my RPi to feed data to Flightradar24):
usermod -l fr24 pi
usermod -m -d /home/fr24 fr24
Logout (logout) or restart your RPi (sudo reboot -n) or shut it down (sudo shutdown now) and start it up again. After that, login with a new username and see, if change is effective.
Note, that changing pi user into something else instead of deleting it and creating a new user is essential, if you want to boot RPi with some user already logged in. As raspi-config allows you to configure auto-login feature for pi user only.
Read more on this here.
Lock root
If you want to make your RPi even stronger then simply lock root user and prevent anyone from using it.
From this moment on, you will only be able to use your pi user (or any name you gave it in previous point) and you will be forced to prepend each command with sudo or give yourself a temporal root privileges with sudo su. So, before you lock root user, make yourself sure that you can use pi instead:
sudo apt list
If you are sure, you want to continue then lock root user:
sudo passwd -l root
Internet
Your RPi comes with wired Internet connection setup ready for obtaining IP address from local DHCP server. If you need either wireless connection or static IP then the next two points are for you.
Configure wireless network
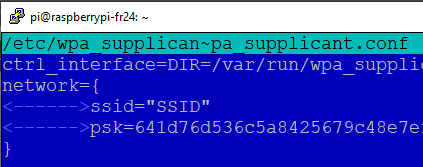
Execute following commands to add your network’s PSK key in an encrypted form to the end of /etc/wpa_supplicant/wpa_supplicant.conf file:
sudo su
wpa_passphrase "SSID" >> /etc/wpa_supplicant/wpa_supplicant.conf
Now, type your network’s PSK (it will be visible on screen!), hit Enter and execute following:
exit
sudo nano /etc/wpa_supplicant/wpa_supplicant.conf
Use F8 (or Ctrl+K, if you are using nano) to delete unnecessary lines:
- Example network extry in the beginning of file (keep
ctrl_interfaceline!) - The
# reading passpharse from stdinline - The
#pskline with unencrypted password
At the end you should get something like that:
If you are on Raspberry Pi 3B+ or Raspberry Pi 4B and want to use 5 GHz network then you must add these two lines:
update_config=1
country=GB
line to your wpa_supplicant.conf file so that the 5 GHz networking can choose the correct frequency bands for your country.
Remember that it must be added above network configuration block, not inside it, because this is device-specific not network-specific setting. If you don’t know your country’s two letter code then Wikipedia is your friend (look for Alpha-2 code column).
If your network is hidden (no SSID broadcast) then add scan_ssid=1 to network configuration block.
Save file with Ctrl+O, confirm filename hitting Enter and exit nano with Ctrl+X.
Force wireless client refresh:
wpa_cli -i wlan0 reconfigure
And verify whether your wireless connection works:
ifconfig wlan0
If the inet addr field has an address beside it, the Raspberry Pi has connected to the network.
Keep in mind that if you have configured static IP addressing even for different medium, i.e. ethernet cable (see below) then refreshing wpa_cli most likely won’t be enough and you need to perform full Raspberry Pi’s restart with sudo reboot -n.
Raspberry Pi can be used in wireless network in many scenarios:
- Typical Wi-Fi configuration using console: Setting up a wireless LAN via the command line
- Wi-Fi configuration in desktop: Wireless connectivity in the Raspberry Pi Desktop
- Routed AP: Setting up a Raspberry Pi as a routed wireless access point
- AP bridge: Setting up a Raspberry Pi as a bridged wireless access point
Configure static IP
To learn what is your current IP configuration, simply type:
ifconfigfor all mediumifconfig eth0for cable connectionifconfig wlan0for wireless network
The first one will list you eth0 and wlan0 medium along with lo for local loop-back connection.
If you need your RPi to be accessible under static IP then edit dhcpcd.conf:
nano /etc/dhcpcd.conf
uncommet (remove trailing # character) following lines (in Example static IP configuration section):
interface eth0
static ip_address=192.168.2.40/24
static routers=192.168.2.1
static domain_name_servers=192.168.2.1 8.8.8.8
Or add them at the end of file if missing.
Make sure that you:
- Provide your own IP, gateway and DNS (above is just an example)
- Replace
interface eth0withinterface wlan0, if you are configuring static IP addressing for Wi-Fi - Remove lines with hex address (i.e.
fd51:42f8:caae:d92e::ff/64), if your network is not using IPv6 addressing
Restart your box (sudo reboot -n) and execute ifconfig after to verify, if changes are applied.
Using profile and fallback keywords in dhcpcd.conf file you can create a fallback mechanism, i.e. force obtaining IP address from DHCP server as default and fallback to static addressing when this fails. For more information read comments in dhcpcd.conf file.
To revert these changes and go back to DHCP-assigned IP address for your RPi:
- Run
nano /etc/dhcpcd.confagain - Remove or comment out lines that you have modified previously (see above)
- Restart your box (
sudo reboot -n) and executeifconfigafter to verify
Of course, each time you change your configuration (from DHCP-assigned to fixed IP address and back) you will have to connect to your RPi under that new IP address. You won’t be able to reach it under “old” one.
Read more about this here.
Check, if you are connected
Note that:
- Correct IP configuration (both static and dynamic)
- The fact that you can access your Pi via SSH in your local network
- Or that you can execute
sudo apt updatesuccessfully (because it doesn’t download anything!)
doesn’t actually imply that your box has access to Internet.
I had such situation that I have mistakenly commented out last two lines in the above code, causing my Pi to have a valid IP address (and thus accessible in the network), but invalid gateway and DNS configuration (thus making it unable to access the Internet).
To verify that your RPi can “talk with the net” either ping Google (or anything else):
ping -c2 google.com

Or use wget to get response from any URL, i.e.:
wget --spider https://onezeronull.com
It sends a regular HTTP request so you can expect a regular HTTP response meaning that a line:
HTTP request sent, awaiting response… 200 OK
is what you are looking for.
Alternatively, you can monitor your Internet speed on regular basis (next chapter). It will tell you exactly the same, because method shown there (Speedtest.net) requires access to the external domain and will fail, if you are not connected to the Internet.
Monitor your Internet speed
You can easily check your Internet speed with Speedtest.net client. For some minimalist versions of Linux you may need to install Python pip first (on Raspbian it should be available):
sudo apt install python-pip
sudo pip install speedtest-cli
You will be forced to confirm this installation, because entire Python package has 60+ MB. You can, of course, use this wonderful programming language for many, many more things than just checking the Internet speed.
After installation is completed you can execute any of these:
speedtest-cli
speedtest-cli --simple
Speedtest.net client can be used to actually monitor your Internet speed on regular basis and report it to i.e. Google Drive. This is however a much bigger topic that is nicely covered in the “How to use your Raspberry Pi to monitor broadband speed” article.
Keep in mind that Raspberry Pi is a budget-level solution and for various reasons it can report network speed even 20 times slower than a regular PC connected to the same router. So, high-level network speed monitoring with RPi is rather out of question here.
Display
Screensaver
When using desktop (graphical) version of Linux on-board Raspberry Pi, it is up to system settings if / when your screen goes black without any mouse move or key press. Use corresponding configuration item or run sudo raspi-config from command line.
When using non-graphical console-only Linux in your Box, type this to get current screen timeout:
cat /sys/module/kernel/parameters/consoleblank
The value is given in seconds with 0 value taken as never.
To change this value edit /boot/cmdline.txt file in nano:
sudo nano /boot/cmdline.txt
Add requested value (i.e. consoleblank=60 for 1 minute) at the end of single line found in this file. Save changed file with F2, exit editor with F10 and restart your Pi with sudo reboot -n.
If you have a touch screen (or any other kind of) attached to your RPi then the above will work only for that screen (and only partially). HDMI screen will remain turned on all the time. And you will have to turn it off manually with the following commands.
Turning HDMI on and off
If your box outputs anything through HDMI port, you can turn this display on and off using console:
vcgencmd display_power 0— shut off HDMI display until further change or next RPi rebootvcgencmd display_power 1— turn HDMI display on
These commands works of course 100% remotely. I.e. You can login to your RPi via SSH and turn off (or on) HDMI attached screen even being miles away from your equipment.
Read more on turning HDMI on/off and setting screensaver timeout here.
Other stuff
Control temperature
You may want to take a look at how hot your Pi is:
- One time check:
/opt/vc/bin/vcgencmd measure_temp - Loop check (one measure per each 2 seconds):
watch /opt/vc/bin/vcgencmd measure_temp
You can break loop check by pressing Ctrl+C.
The usable operating temperature for Raspberry Pi is 0°C to 70°C.
Ranges of -40°C to 85°C or even higher are reported as being generally not harmful to most of the RPis, but for sure are not recommended as a every-day usage and operational temperatures (neither for mainboard nor for chips on it).
Read more about this here.
Change timezone etc.
You can change it (and a lot of other things) using sudo raspi-config (Localisation Options → Timezone).
Update everything
Skip this point, if feeding data to Flightradar24 (i.e. using Pi24 image)!
In sharp words, an occasional call to:
sudo apt update
sudo apt upgrade
sudo apt autoremove
or sudo apt full-upgrade all together won’t hurt (except for sometimes taking over an hour — see end of this article) But might help! :>
Kick it
If you ever need to restart or shutdown your device then these commands might be useful:
- Change user or re-login:
logout - Restart your RPi:
sudo reboot -n - Shut down your box
sudo shutdown now
This is just a memo for me, as I keep forgetting about these obvious commands.
Flightradar24
At the very end, a short memo for myself, since I am using this box for a specific purpose.
DO NOT install anything (drivers, new packages), do not update anything (with), if using Pi24 image! ANY change to original system will most likely break poorly written auto-start feature of Pi24. Resulting in Pi24 GUI not starting or fr24feed service not feeding anything to your account!
Installation
Quick install and activation:
sudo systemctl stop fr24feed
sudo bash -c "$(wget -O - https://repo-feed.flightradar24.com/install_fr24_rpi.sh)"
sudo systemctl restart fr24feed
Resources:
- Elevation: 918.6 feet (Elevation Finder)
- Account: 25401 + My account
That should be all.
Verification
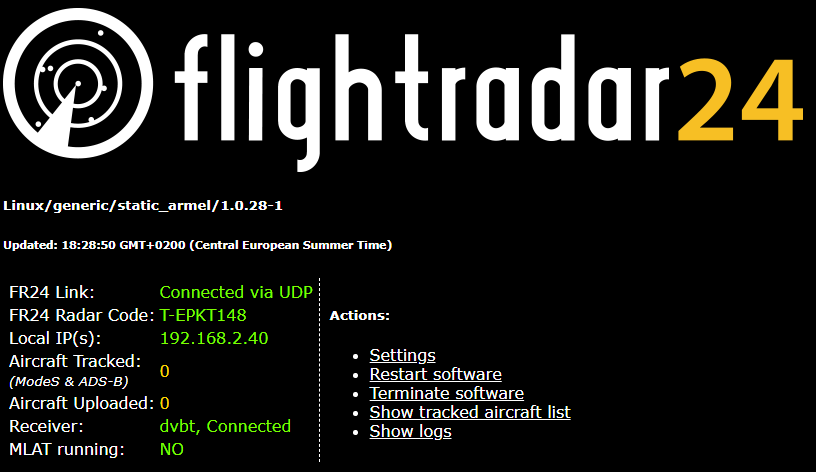
You can always monitor your fr24feed service via browser, by connecting to your Raspberry Pi’s IP address over 8754 port. I. e. if you enabled static IP address and set it to i.e. 192.168.2.40 then you can visit http://192.168.2.40:8754/ to observe the results:
You can check how is your receiver doing, by running dump1090-mutability directly in interactive mode:
/usr/bin/dump1090-mutability --interactive
A result close to this says that everything is OK with your ADS-B data dumping service:

If something fails or isn’t working then systemctl status fr24feed.service might help.
Extra data
You can read raw data and Basestation output (if you enabled it during installation of fr24feed service) at:
- http://192.168.X.Y:30002/
- http://192.168.X.Y:30003/
But these extra services produces output that cannot be parsed by a regular browser, so you need some extra software to get your hands on this data.